RaspberryPi Client

The SentiloClientNodej is a library written in javascript that brings to you the possibility to connect any device and embedded device with Node.js to a Sentilo instance easily.
For this example we’ll use a Raspberry pi device, because its special features, like cheap price, small dimensions and the great input-output possiblities.
Hardware
We need some hardware to execute this example:
| Material | Description |
| Raspberry Pi | Of course, we need a Raspberry Pi, doesn’t matters its version. You need a Raspbian distro installed too |
| Ethernet cable or wifi dongle | Doesn’t matter what network hardware do you use, it’s up to you, but you’ll need the correct drivers correctly configured for connecting to Internet |
| Some cables | Some “dupont” male-to-female cables to make breadboard connections |
| A LED | We’ll use a LED as an output for simulating order execution, you can pick any color |
| A resistor | A 470 Ohms 1/4W resistance |
| A breadboard | You’ll need an electronic connections base to make some circuits, so we’ll recommend you to get a breadboard |
Software
We need to install some node.js alternative modules or libraries. We’ll install them through npm or download them from the Internet. See the next section for more information.
Setup the Raspi
In this example we’ll show to you how to implement a sensor and a actuator with several capabilities such as:
- get values from one o more sensors connected to it GPIO port and publish them in Sentilo
- receive orders from a Sentilo application and actuate on the GPIO in consequence
We’re assuming that you have yet installed Node.js in your system and your user has privileges to manage the GPIO. If not, you can try an easy tutorial like the described in this link.
NOTE: we recommend that you have installed latest versions of Node.js and npm. You can test it as follow:
pi@raspberrypi ~/sentilo $ node -v
v0.12.1
pi@raspberrypi ~/sentilo $ npm -v
2.5.1
The software
Create the workspace
First of all, create a directory named sentilo (for example) in our user home and change to it:
pi@raspberrypi ~ $ mkdir sentilo && cd sentilo
Here we’ll work with all our files.
Install the SentiloClientNodejs library
Download the library, that allow to us to access some Sentilo operations easily.
You muy download it from the Sentilo Git repository, and clone it into your working directory:
pi@raspberrypi ~/sentilo $ git clone https://github.com/sentilo/sentilo-client-nodejs
After that, you may have a directory structure like this into the sentilo-client-nodejs directory:
pi@raspberrypi ~/sentilo $ ls -la sentilo-client-nodejs
total 28
drwxr-xr-x 4 pi pi 4096 nov 17 13:00 .
drwxr-xr-x 3 pi pi 4096 nov 17 13:00 ..
drwxr-xr-x 8 pi pi 4096 nov 17 13:00 .git
-rw-r--r-- 1 pi pi 1352 nov 17 13:00 LICENSE
-rw-r--r-- 1 pi pi  257 nov 17 13:00 package.json
-rw-r--r-- 1 pi pi 3079 nov 17 13:00 README.md
drwxr-xr-x 3 pi pi 4096 nov 17 13:00 src
Here we have the core library (the src directory) and now we can write down the example files (see below).
Install some library dependencies
We need some Node.js modules to work with our library. So you need to download and install the throgh npm.
You can download via npm update:
pi@raspberrypi ~/sentilo/sentilo-client-nodejs $ npm
Or install them directly:
pi@raspberrypi ~/sentilo/sentilo-client-nodejs $ npm install restify
pi@raspberrypi ~/sentilo/sentilo-client-nodejs $ npm install sync-request
pi@raspberrypi ~/sentilo/sentilo-client-nodejs $ npm install onoff
Ok, but, what are they?
- restify is a rest server interface for Node.js that allow to us to create a rest server easily (see this link for more information)
- sync-request, allow to us to create synchronous http calls (see this link for more information)
- onoff, a GPIO driver that allow to us to turn on and off a LED very easily! (see this link for more information)
Now, we can start to debvelop with node in our working directory
Connecting the hardware
We’ll assume that you have your Raspberry Pi connected to the Internet, a Raspbian system correctly installed and enough permissions to create and runs scripts in your user home. Usually, we will use the pi user.
To simulate a sensor’s actuator, we’ll use a LED connected to the GPIO 14 from the Raspberry Pi.
Let see it below:
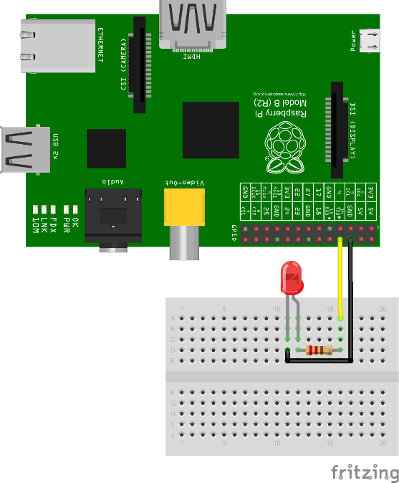
As you can see, we only connect the LED annode to the 14 GPIO pin, and the kathode to the GND pin. We’re ready to turn ON and OFF this LED from the Sentilo platform.
The example
Our example is a complete suit to test the SentiloClientNodejs library.
The library allow to you to performs these operations:
- Catalog
- Get sensors from a provider
- Register sensors for a provider
- Update sensors configuration
- Register alerts
- Alarm
- Publish alarms
- Data
- Retrieve last observations from a sensor
- Publish observations
- Subscription
- Subscribe orders from a sensor
- Subscribe orders for all the sensors of a provider
In our example, we’ll use almost of the to show you how interact with Sentilo platform
The code
We’ve created our working directory, and connected all the necessary hardware. Now we can take a look to the example code.
The next files was included into the library directory, so you have they into your working directory.
Note that you can download these all example files from https://github.com/sentilo/sentilo-client-sample-nodejs.
actuator.js
This file contains code to control the output LED, that performs a simulation of a possible actuator controlled by the Raspberry Pi and orders published on the Sentilo platform. In the example, the system is being subscribed as enpoint to receive incoming order actuation calls.
var Gpio = require('onoff').Gpio;
var led;

/**
 * Sample module that perfoms operations over the actuator
 */
module.exports = {

    /**
     * Initializes the actuator. For this example, we've connected a LED as a
     * output in the GPIO 14
     */
    init : function() {
        // Configure the GPIO as OUTPUT
        led = new Gpio(14, 'out');

        console.log('Turning OFF the LED');

        // Turn off the LED on startup
        led.writeSync(0);
    },

    /**
     * Execute an order in the actuator. For this example, we've mounted a LED
     * in GPIO 14, where we can turn it ON (order=ON) or OFF (order=OFF)
     *
     * @param order
     *            A Sentilo order object structure
     */
    executeOrder : function(order) {
        console.log('Executing order: ' + order.message);

        if (order.message === 'ON') {
            console.log('Turning ON the LED');
            led.writeSync(1);
        } else if (order.message === 'OFF') {
            console.log('Turning OFF the LED');
            led.writeSync(0);
        }

    }

};
What’s happening here?
- The init function configures the GPIO 14 as an output to control the LED (don’t forget to call it!)
- The executeOrder function performs the actuator order execution, for our case, lets turn ON and OFF the LED if the order was ON or OFF. The main server code will access to this function to actuate over the sensor actuator.
sensor.js
This file contains the code that performs a possible sensor data read and return its value. For our example, we only emulate a random value as a possible sensor data value. You may develop an data input sensor with a GPIO library.
module.exports = {

    /**
     * Retrieve data from the sensor
     *
     * @returns {String}
     */
    readSensorValue : function() {

        // TODO: Implement this method

        // Return some random value between 0 and 255
        var sensorValue = Math.floor((Math.random() * 255));

        return sensorValue;
    }

};
What’s happening here?
- The readSensorValue function reads a possible sensor input data value from an external way. The main server code will access to this function to read the sensor data.
NOTE: as you see, you must implement this function to complete your requirements
sentilo.js
This file is a little interface that wraps the general calls to the library. Its function is make more easy the interactuation between the server and the library. It isn’t really necessary, but is a good method to modularize the code.
var servicesConfig = require('./sentiloclient/ServicesConfiguration');
var logger = require('./sentiloclient/utils/SentiloLogs');
var utils = require('./sentiloclient/utils/SentiloUtils');

var catalog = require('./sentiloclient/CatalogServiceOperations');
var data = require('./sentiloclient/DataServiceOperations');
var alarm = require('./sentiloclient/AlarmServiceOperations');
var subscribe = require('./sentiloclient/SubscriptionServiceOperations.js');

module.exports = {

    /**
     * Initialize the services with default and cuistom options
     */
    init : function(initOptions) {
        // Initialize the services
        catalog.init(initOptions);
        data.init(initOptions);
        alarm.init(initOptions);
        subscribe.init(initOptions);

        logger.debug("Samples module initialization successful");
    },

    /**
     * Search a sensor in the catalog
     *
     * @return boolean
     */
    existsSensorInCatalog : function(options) {
        // Get all sensors from provider
        var response = catalog.getSensors(options);

        // The params os the example
        var provider = options.provider;
        var sensor = options.sensor;

        // Look the desired sensor in the catalog...
        var existsSensor = false;
        if (response && response.providers) {
            var providers = response.providers;
            for (var p = 0; p < providers.length; p++) {
                var provider = providers[p];
                if (provider.sensors && provider.sensors.length > 0) {
                    var sensors = provider.sensors;
                    for (var s = 0; s < sensors.length; s++) {
                        var sensor = sensors[s];
                        if (sensor === sensor.sensor) {
                            existsSensor = true;
                            break;
                        }
                    }
                }
            }
        }

        logger.debug('Exists the \'' + provider + '\' and \'' + sensor + '\' in the catalog? ' + existsSensor);

        return existsSensor;
    },

    /**
     * Create a sensor
     */
    createSensor : function(options) {
        logger.debug('Adding the sensor \'' + options.sensor + '\' to the catalog...');

        // Create an input message to inform the new sensor data
        // We are using the sample data, defined in ServicesConfiguration module
        var inputMessage = {
            body : {
                sensors : [ {
                    sensor : options.sensor,
                    description : options.sensorDesc,
                    type : options.sensorType,
                    dataType : options.sensorDataType,
                    unit : options.sensorUnit,
                    component : options.component,
                    componentType : options.componentType,
                    location : options.sensorLocation
                } ]
            }
        };

        logger.debug(inputMessage);

        var response = catalog.registerSensors(inputMessage);
        if (response && response.code && response.code === 400) {
            logger.error('Error registering the sensors');
            logger.error(response);
            return false;
        } else {
            return true;
        }
    },

    /**
     * Publish observations
     */
    publishObservations : function(value, options) {
        var observationsInputMessage = {
            body : {
                observations : [ {
                    value : value
                } ]
            }
        };

        observationsInputMessage = utils.mergeOptions(observationsInputMessage, options);

        var response = data.sendObservations(observationsInputMessage);
        if (response && response.code && response.code === 400) {
            logger.error('Error publishing observations');
            logger.error(response);
            return false;
        } else {
            return true;
        }
    },

    /**
     * Create an alert list
     */
    createAlerts : function(alertsList) {
        var alertsImputMessage = {
            body : {
                alerts : alertsList.alerts
            }
        };

        var response = catalog.registerAlerts(alertsImputMessage);
        if (response && response.code && response.code === 400) {
            logger.error('Error registering alerts');
            logger.error(response);
            return false;
        } else {
            return true;
        }
    },

    /**
     * Publish an alarm
     */
    publishAlarm : function(alert, inputMessage) {
        var alarmInputMessage = {
            body : {
                message : inputMessage.message
            }
        };

        var response = alarm.publish(alert, alarmInputMessage);
        if (response && response.code && response.code === 400) {
            logger.error('Error publishing alarm');
            logger.error(response);
            return false;
        } else {
            return true;
        }
    },

    /**
     * Subscribe to a sensor order
     */
    subscribeOrder : function(inputMessage) {
        var subscriptionInputMessage = {
            body : {
                endpoint : inputMessage.endpoint
            }
        };

        var response = subscribe.subscribe(subscriptionInputMessage);
        if (response && response.code && response.code === 400) {
            logger.error('Error subscribing order');
            logger.error(response);
            return false;
        } else {
            return true;
        }
    },

    /**
     * Subscribe to all sensors orders from a provider
     */
    subscribeOrderToAll : function(inputMessage) {
        var subscriptionInputMessage = {
            body : {
                endpoint : inputMessage.endpoint
            }
        };

        var response = subscribe.subscribeToAll(subscriptionInputMessage);
        if (response && response.code && response.code === 400) {
            logger.error('Error subscribing order');
            logger.error(response);
            return false;
        } else {
            return true;
        }
    }
};
Here you can see direct calls to the library, so the only differences are several logs and the initialization of some configuration variables.
server.js
This is the main node file. This file performs a rest server and still waiting for incoming calls that apply to the actuator.
// A very simple RESTFul server module
var restify = require('restify');

// The OS information module
var os = require('os');

// Include some Sentilo operations
var sentilo = require('./sentilo.js');

// Module that interacts with the local sensor
var sensor = require('./sensor.js');

// Module that interacts with the local actuator
var actuator = require('./actuator.js');
actuator.init();

// Get some OS values, like the sensor IP
var interfaces = os.networkInterfaces();
var addresses = [];
for (var k in interfaces) {
    for (var k2 in interfaces[k]) {
        var address = interfaces[k][k2];
        if (address.family === 'IPv4' && !address.internal) {
            addresses.push(address.address);
        }
    }
}
var myIp = addresses[0];
var myPort = 8080;
var myEndpoint = 'http://'+myIp+':'+myPort;
var myOrderEndointPath = '/order';
var myOrderEndoint = myEndpoint + myOrderEndointPath;

console.log('My ip address is: ' + myIp + ', and my port: ' + myPort);

// Service and example options
// You must modify it under your requeriments
var samplesOptions = {
    host : 'YOR_SERVER_HOST',
    port : 'YOUR_SERVER_PORT',
    headers : {
        identity_key : 'YOUR_IDENTITY_KEY'
    },
    tokenId : 'YOUR_IDENTITY_KEY',
    providerTokenId : 'YOUR_PROVIDER_IDENTITY_KEY',
    provider : 'samples-provider',
    sensor : 'sample-sensor-nodejs',
    component : 'sample-component',
    componentType : 'generic',
    sensorDataType : 'TEXT',
    sensorType : 'status',
    sensorUnit : '',
    sensorLocation : 'YOUR_SENSOR_LOCATION'
};

// Starts a RESTFul server to manage orders inputs via POST calls
var server = restify.createServer({
    name : 'SentiloClient for Nodejs Example Server',
    version : '1.0.0'
});
server.use(restify.acceptParser(server.acceptable));
server.use(restify.queryParser());
server.use(restify.bodyParser());

// We only need a POST endpoint service to receive ordercs callbacks
// The path will be [POST] http://localhost:8080/order
server.post('/order', function(req, res, next) {
    res.send(req.params);

    console.info("[POST] Order received: " + JSON.stringify(req.params));

    // Execute the order in the actuator
    actuator.executeOrder(req.params);

    var value = 'Order received and executed: ' + JSON.stringify(req.params.message);
    sentilo.publishObservations(value, samplesOptions);

    return next();
});

// Starts the server and listen on port 8080
server.listen(myPort, function() {
    console.log('%s listening at %s', server.name, myEndpoint);
    console.log('The server is now ready to receive POST incoming calls');
});

// Init Sentilo services for this example
// Here you must pass as paramether the specific configuration
sentilo.init(samplesOptions);

// Test if is there the sensor configured in the catalog
var existsSensor = sentilo.existsSensorInCatalog(samplesOptions);
if (!existsSensor) {
    // If not, then create it
    sentilo.createSensor(samplesOptions);
}

// Now we can publish a first alarm that informs that the sensor is up
// First of all let create an external alert
console.log('Registering the System Status Alert...');
var alertsListInputMessage = {
    alerts : [ {
        id : 'SYSTEM_STATUS_ALERT',
        name : 'SYSTEM_STATUS_ALERT',
        description : 'Custom alert to inform the system status',
        type : 'EXTERNAL'
    } ]
};
sentilo.createAlerts(alertsListInputMessage);

// And then, we can publish an alarm to inform that the system is up now
var alarmInputMessage = {
    message : 'The system goes up on ' + new Date()
};
sentilo.publishAlarm('SYSTEM_STATUS_ALERT', alarmInputMessage);
console.log('Alarm published: ' + alarmInputMessage.message);

// Subscribe the sensor orders
// We'll manage it throught our server on POST service
var subscriptionInputMessage = {
    endpoint : myOrderEndoint
};
sentilo.subscribeOrder(subscriptionInputMessage);
// sentilo.subscribeOrderToAll(subscriptionInputMessage);

// Now, we can publish observations every 60 seconds
// And still waiting for incoming orders
var systemObservationsTimeout = 60000;
console.log('The sensor is now up, and we\'ll be sending some observations every ' + systemObservationsTimeout + ' ms');
setInterval(function() {
    // Send some System information
    var freeMemValue = "OS freemem: " + os.freemem();
    console.log('Retrieved system freemem value: [' + freeMemValue + '] and publishing it as an observation...');
    sentilo.publishObservations(freeMemValue, samplesOptions);

    // Retrieve some sensor data and send it as observation...
    var sensorDataValue = "Sensor value: " + sensor.readSensorValue();
    console.log('Retrieved sensor value: [' + sensorDataValue + '] and publishing it as an observation...');
    sentilo.publishObservations(sensorDataValue, samplesOptions);
}, systemObservationsTimeout);
First of all, we’ll see the configuration options. They must be changed before run this example.
You must provide the correct values for these variables located into the samplesOptions object:
- YOR_SERVER_HOST: provide the correct ip address or host of your Sentilo’s instance rest server
- YOUR_SERVER_PORT: provide the correct port of your Sentilo’s instance rest server
- YOUR_IDENTITY_KEY: you must provide your private security key (tokenId) that identifies your application. Remember that this application must have ADMIN permissions over all yours providers, components and sensors for this example
- YOUR_PROVIDER_IDENTITY_KEY: like above, you must provide your provider’s security token id
- YOUR_SENSOR_LOCATION: this is optional, identifies the component location of the sample sensor
All the other configurations and variables are correctly coded and you don’t need to change any more.
Now, what’s happens in this code?
- First of all, we’re start a rest server with the restify module, that allow to us to provide an endpoint for incoming order calls (POST method). After that, we create a subscription for our orders.
- When a POST call is received, the server will call the actuator’s executeOrder function, so we can manage the order correctly (turn ON/OFF the LED, for example)
- Initialize the sentilo’s helper module (as you can see above), implemented by the sentilo.js file
- We’re passing to it our specific services configuration, like the sensor id, provider’s token, etc…
- Request for the sensor in the Sentilo Catalog platform, and if it doen’t exists, create it
- Once we have created the sensor, we’re creating an alert, named SYSTEM_STATUS_ALERT, and publishing an initial alarm that says The system goes up on {date}. Then, the sensor is up and we’re informing it to the system
- After tgat, retrieve some system and sensor data values and publish them every 60000ms (1 minute) in a infinite loop
Executing the example
Now we can finally execute the example.
Simple type:
pi@raspberrypi ~/sentilo/sentilo-client-nodejs $ node server.js
Turning OFF the LED
My ip address is: 127.0.0.1, and my port: 8080
Registering the System Status Alert...
Alarm published: The system goes up on Thu May 07 2015 13:52:21 GMT+0000 (UTC)
The sensor is now up, and we'll be sending some observations every 60000 ms
SentiloClient for Nodejs Example Server listening at http://127.0.0.1:8080
The server is now ready to receive POST incoming calls
And now, the server is waiting for publish the observations everi 60 seconds:
Retrieved system freemem value: [OS freemem: 846716928] and publishing it as an observation...
Retrieved sensor value: [Sensor value: 64] and publishing it as an observation...
Publishing and accepting orders
The server also is witing for incoming POST calls that responses the ORDER requests. You can practice with orders, sending a PUT message to the Sentilo platform, some like this:
http://sentilo_platform_ip:8081/order/samples-provider/sample-sensor-nodejs
With these values:
HEADER > identity_key : 'YOUR_IDENTITY_KEY'
BODY   > {"order" : "ON"}  > this turns ON the LED
BODY   > {"order" : "OFF"} > this turns OFF the LED
After that, you’ll see in the console some log like this when you’re turning the LED ON, sending order = ON:
[POST] Order received: {"message":"ON","timestamp":"07/05/2015T13:58:20","topic":"/order/samples-provider/sample-sensor-nodejs","type":"ORDER","sensor":"sample-sensor-nodejs","provider":"samples-provider","sender":"samples-provider","time":1431007100595}
Executing order: ON
Turning ON the LED
Or turning it OFF, with order = OFF:
[POST] Order received: {"message":"OFF","timestamp":"07/05/2015T14:01:13","topic":"/order/samples-provider/sample-sensor-nodejs","type":"ORDER","sensor":"sample-sensor-nodejs","provider":"samples-provider","sender":"samples-provider","time":1431007273310}
Executing order: OFF
Turning OFF the LED
Debugging the library
If you need to debug your execution, you can edit the file /sentiloclient/utils/SentiloLogs.js and edit the logs configuration properties, as you need:
var options = {
    className : 'Sentilo',
    enableLogs : true,
    enableDebug : false,
    enableInfo : true,
    enableWarn : true,
    enableError : true,
    enableFatal : true
};
For our purpose, we only have DEBUG, INFO and ERROR logs. Try tu use true or false for each one.